Monday, 10 December 2012

Tutorial - Christmas Crackers


Handmade crackers are fun to make, and you can fill them with personalised gifts and use them as place settings. I'm making the crackers this year, and my husband is in charge of writing the bad jokes to put inside.

You will need, per cracker:
1 loo roll tube
1 cracker snap (I got mine on ebay for about £1.60 for 12)
1 A4 sheet of festive paper
A slightly larger piece of tissue paper
Luggage tag
Ribbon, wool or string
Decorations, eg stickers or cardmaking toppers.
Joke or General Knowledge Question
Chocolates and gift - mine mostly came from charity shops. I'm using vintage wooden push up toys, jewellery, Guatamalan worry dolls, and miniature bottles of whiskey.


1.  Put a cracker snap, chocolate, joke and gift inside the loo roll.


2. Roll the piece of tissue around the loo roll, and glue or tape in place. Then do the same with the A4 coloured paper, making sure that the tisse sticks out the ends.


3.Twist each end of the cracker and tie with ribbon, wool or string.


4. Write the name of the recipient on the luggage tag, glue to the cracker and decorate with stickers, toppers, buttons or whatever you like.

Tutorial - Easy Christmas Cards


These jolly holiday cards are easy to make using festive papers, luggage tags and ribbon.

You will need:
Card blanks and envelopes
Festive paper in at least two colours or designs (you can use wrapping paper, scrapbooking papers, vintage wallpaper or even fabric).
Luggage tags
3mm ribbon
Glue
Small Christmas Rubber Stamp (eg pudding, robin, snowflake, Christmas Tree) and Ink Pad

1. Stamp the luggage tag with the Christmas rubber stamp, and leave to dry for a few minutes.

2. Tie a 6" piece of ribbon to the top of the tag and tie in a bow. Cut ends to the right length.


3. Cut 2 rectangle pieces from the Christmas paper. Use two contrasting patterns. The size will depend on the size of your cards, but one rectangle should be about half an inch smaller in length and width than the larger rectangle. Use a guillotine if you've got one, but I prefer my cards to look a bit wonky and handmade, there are no straight lines in nature.


4. Glue the larger rectangle to the card, then the smaller rectangle, followed by the luggage tag.


5. You can play around with other designs. Instead of stamping the tag, use cardmaking toppers, stickers, festive buttons or beads. Use glittery card instead of printed paper.


Happy Making!

Sunday, 9 December 2012

Tutorial - How to make a Christmas House


Decorate a cute house to display your Christmas ornaments and trinkets.

You will need:
A Chipboard display house
PVA glue
White Paint & Paintbrush
Christmas Papers (I got mine from Tesco but you can also find them in Cardmaking craft shops and places like Paperchase or Hobbycraft). You can use scrapbook backing paper, vintage wallpaper, wrapping paper, or wallpaper for dolls houses. 


1. Start by priming your chipboard house, this is an undercoat of dilute PVA to stop the paint getting absorbed into the chipboard. Make a mixture of 3 parts PVA glue and one part water, and paint onto all surfaces of the house. Leave to dry overnight. You can skip this part but you may end up with chipboard showing through the paint.


2. Paint the house with white paint, it may need a couple of coats. Leave to dry.


3. Wallpaper your house! Measure the internal compartments and cut the papers to size. Glue in place.


4. Then have fun filling the compartments with Christmassy objects. You can use vintage cake decorations, acorns, pine cones, sweets, anything you like!


Monday, 3 December 2012

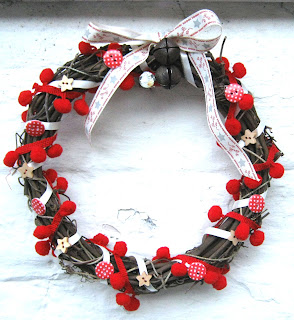
Tutorial - Christmas Wreath


Raid your haberdashery stash to decorate a festive wreath using ribbon, pom-pom trim and buttons.

You will need:
Vine wreath
Plain ribbon, about 2 metres
Pom-pom trim, 1 metre
Christmas ribbon
Jingle bells
Assorted buttons
Needle & thread 


1. Begin by choosing a colour scheme. I used red pom-pom trim (to look like holly berries), cream ribbon, rusty jingle bells, wooden star buttons and red polka dot buttons. You could also use vintage wooden cotton reels, brocade ribbon, organza, beads, or even zips.


2. Wrap some plain ribbon around the vine wreath. Don't wrap it too tightly, it should look kind of rustic and effortless. Bear in mind that the buttons will be sewn to the ribbon at the end. Pin or tack the two ends of ribbon together at the back.


 3. Loosly wrap some pom-pom trim around the wreath, and pin or tack the two ends together at the back.


4. Tie the jingle bells on to the top of the wreath using some festive ribbon. Make a bow.


5. Tack the buttons to the plain ribbon all the way around the wreath. Just one stitch in and out should hold them in place. Alternatively, glue the buttons to the ribbon.


And that's it! Your wreath should last years if you hang it indoors, but as the ribbons are just tacked on, it's easy to add or remove them, and you can re-use the wreath again with a different colour scheme another year.