Monday 10 December 2012

Tutorial - Christmas Crackers


Handmade crackers are fun to make, and you can fill them with personalised gifts and use them as place settings. I'm making the crackers this year, and my husband is in charge of writing the bad jokes to put inside.

You will need, per cracker:
1 loo roll tube
1 cracker snap (I got mine on ebay for about £1.60 for 12)
1 A4 sheet of festive paper
A slightly larger piece of tissue paper
Luggage tag
Ribbon, wool or string
Decorations, eg stickers or cardmaking toppers.
Joke or General Knowledge Question
Chocolates and gift - mine mostly came from charity shops. I'm using vintage wooden push up toys, jewellery, Guatamalan worry dolls, and miniature bottles of whiskey.


1.  Put a cracker snap, chocolate, joke and gift inside the loo roll.


2. Roll the piece of tissue around the loo roll, and glue or tape in place. Then do the same with the A4 coloured paper, making sure that the tisse sticks out the ends.


3.Twist each end of the cracker and tie with ribbon, wool or string.


4. Write the name of the recipient on the luggage tag, glue to the cracker and decorate with stickers, toppers, buttons or whatever you like.

Tutorial - Easy Christmas Cards


These jolly holiday cards are easy to make using festive papers, luggage tags and ribbon.

You will need:
Card blanks and envelopes
Festive paper in at least two colours or designs (you can use wrapping paper, scrapbooking papers, vintage wallpaper or even fabric).
Luggage tags
3mm ribbon
Glue
Small Christmas Rubber Stamp (eg pudding, robin, snowflake, Christmas Tree) and Ink Pad

1. Stamp the luggage tag with the Christmas rubber stamp, and leave to dry for a few minutes.

2. Tie a 6" piece of ribbon to the top of the tag and tie in a bow. Cut ends to the right length.


3. Cut 2 rectangle pieces from the Christmas paper. Use two contrasting patterns. The size will depend on the size of your cards, but one rectangle should be about half an inch smaller in length and width than the larger rectangle. Use a guillotine if you've got one, but I prefer my cards to look a bit wonky and handmade, there are no straight lines in nature.


4. Glue the larger rectangle to the card, then the smaller rectangle, followed by the luggage tag.


5. You can play around with other designs. Instead of stamping the tag, use cardmaking toppers, stickers, festive buttons or beads. Use glittery card instead of printed paper.


Happy Making!

Sunday 9 December 2012

Tutorial - How to make a Christmas House


Decorate a cute house to display your Christmas ornaments and trinkets.

You will need:
A Chipboard display house
PVA glue
White Paint & Paintbrush
Christmas Papers (I got mine from Tesco but you can also find them in Cardmaking craft shops and places like Paperchase or Hobbycraft). You can use scrapbook backing paper, vintage wallpaper, wrapping paper, or wallpaper for dolls houses. 


1. Start by priming your chipboard house, this is an undercoat of dilute PVA to stop the paint getting absorbed into the chipboard. Make a mixture of 3 parts PVA glue and one part water, and paint onto all surfaces of the house. Leave to dry overnight. You can skip this part but you may end up with chipboard showing through the paint.


2. Paint the house with white paint, it may need a couple of coats. Leave to dry.


3. Wallpaper your house! Measure the internal compartments and cut the papers to size. Glue in place.


4. Then have fun filling the compartments with Christmassy objects. You can use vintage cake decorations, acorns, pine cones, sweets, anything you like!


Monday 3 December 2012

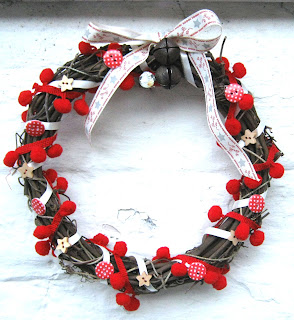
Tutorial - Christmas Wreath


Raid your haberdashery stash to decorate a festive wreath using ribbon, pom-pom trim and buttons.

You will need:
Vine wreath
Plain ribbon, about 2 metres
Pom-pom trim, 1 metre
Christmas ribbon
Jingle bells
Assorted buttons
Needle & thread 


1. Begin by choosing a colour scheme. I used red pom-pom trim (to look like holly berries), cream ribbon, rusty jingle bells, wooden star buttons and red polka dot buttons. You could also use vintage wooden cotton reels, brocade ribbon, organza, beads, or even zips.


2. Wrap some plain ribbon around the vine wreath. Don't wrap it too tightly, it should look kind of rustic and effortless. Bear in mind that the buttons will be sewn to the ribbon at the end. Pin or tack the two ends of ribbon together at the back.


 3. Loosly wrap some pom-pom trim around the wreath, and pin or tack the two ends together at the back.


4. Tie the jingle bells on to the top of the wreath using some festive ribbon. Make a bow.


5. Tack the buttons to the plain ribbon all the way around the wreath. Just one stitch in and out should hold them in place. Alternatively, glue the buttons to the ribbon.


And that's it! Your wreath should last years if you hang it indoors, but as the ribbons are just tacked on, it's easy to add or remove them, and you can re-use the wreath again with a different colour scheme another year.


Thursday 29 November 2012

Rainbow Toddler Mittens & Scarf Set

 
A couple of years ago, my sister-in-law asked me to crochet my nephew (her son) a rainbow striped scarf. He was 3 years old at the time and she said that by the next winter he would start refusing rainbow colours, so she wanted him to have one while he was still young enough. They loved the scarf so I made him a couple of pairs of mittens.


The pattern for both the mittens and scarf is available in my etsy shop, and on Ravelry. To make them you'll need double knitting yarn in 7 colours and a 5.5mm hook. The mittens can be plain, striped or blocks of colour and will fit a 2-4 year old.

Sunday 25 November 2012

New & Improved!

Sweet Yolk Cardigan Pattern now includes toddler sizes. 


This sweet scandi style cardigan has been my most popular pattern, and I've had many requests for toddler sizes. I've now included 1-2 years and 2-3 years. One day I hope to go all the way up to adult sizes but that will take a very long time!


It's available in my shop and at Ravelry, it works up in just a few evenings and makes a great Christmas present for babies and toddlers.

Monday 12 November 2012

Wednesday 7 November 2012

Advent Calendar Crochet Pattern

There are lots of knitting patterns around for advent calendars, but hardly any crochet ones, and those that I found look like they were from the seventies! Nothing wrong with retro patterns, but I decided to try making my own. Here's what I came up with:


There are pockets for each day, for sweets or small toys. I'm going to make it again using cotton next time, but for now, I'm pretty happy with it :)
The pattern is available at etsy and ravelry


Monday 17 September 2012

Just a quick update..

I'm currently on a baby break, enjoying my baby boys but with not much time to crochet :)

Quite often I'm asked if the pattern for 'Sweet Yolk' baby cardigan comes in bigger sizes - I'm working on toddler sizes at the moment. It will be published on Ravelry soon, and if you've already purchased this pattern, you will receive a link to the PDF of the new sizes automatically, free of charge.

Thursday 12 July 2012

The Journey of a Cardigan...


  'Sweet Yolk' Scandinavian-inspired yoke cardigan.

Here's a picture of Henry, taken in August 2011, when he was 4 months old. I made the cardigan some time around February 2011 before he was born, and we didnt know whether he'd be a boy or girl so I chose neutral brown and rust colours.

September 2011, aged 5 months.

 November 2011, aged 7 months. Getting a bit small now...

And now here's little Peter, taken in June 2012, just over 2 months old.
I love it that Peter gets to wear Henry's clothes, there are some things that I will keep even after they have both grown out of them, and this is one of them.

Friday 8 June 2012

Free Crochet Pattern - Extra Chunky Tea Cosy


I'm taking a break from pattern-writing for a little while (I just had 2 babies within a year, phew!) but here's a pattern I wrote a couple of years ago for a ribbed tea cosy. It's been available on Ravelry and my etsy shop for a while, but here's the pattern for free:

Extra Chunky Tea Cosy Pattern


Use extra-chunky yarn to work up a super-quick tea cosy. It fits an aberage 6-cup teapot.

UK / British Crochet Terminology. For USA terminology, click here.

You will need:

9mm crochet hook
100g Extra Chunky Wool (I used Sirdar Denim Ultra). Any super chunky will work, as long as it has an approximate tension of 9sts x 12 rows = 10 cm square.
Yarn needle

Stitch key:
dc = double crochet
bldc = back loop double crochet (crochet in the back loop of each stitch).

Instructions:
Chain 16

1. Dc in 2nd ch from hook. Dc across to end of row (15sts). Ch1, turn.

2. Dc in 1st st. BLDC in next stitch and all stitches to end of row. Ch1, turn.

3–18. Repeat row 2 until you have 18 rows (or until your work loosely covers one side of your teapot.)

19. Dc in 1st st. Ch 13. 1dc in last st of row. Ch1, turn.

20. Dc in 1st st. 13DC in chain space. 1dc in last st. Ch1, turn.

21-38. Repeat Row 2 until you have 18 rows starting from Row 20 or until your work loosely covers your teapot.

Break off yarn leaving a long sewing length.

Joining:
Fold work in half. Sew together first st from first row to last row, leave 13 sts open, and sew last st to last row.

Alternative method – crochet together first sts, slip stitch across 13 sts on one side only, then crochet together last sts. Leave a long sewing length then weave this in an out like a drawstring, pull tight.

Making the pom pom:
Wrap the yarn around your hand until you have lots of layers of yarn, approx 20 times. Cut off.
Cut a length of yarn about 10 inches and tie this around the middle of the bundle. Put scissors through the loops and cut so you effectively have a lot of short lengths tied in the middle. Attach this to the tea cosy using the long sewing length. Trim your pom pom to desired size.

Sew in ends.

Friday 18 May 2012

Welcome Little Peter

Here's my baby boy modelling a Peapod Soup original cardigan. He's nearly 8 weeks old now, getting more aware of his surroundings and starting to smile.


I'm slowly getting back into making things, but H is nearly 14 months old and almost walking, so I've kind of got my hands full!. We've converted our loft into a craft / office space, so I'm really excited about having some space to work and be creative once the littleys are in bed. 

Both my etsy shops are now open after a short break.  Holding a street party of the Royal Jubilee? Then you need to whip up a patriotic tea cosy, available from The Tree Bridge, my crochet pattern store! There's also a pattern for English cakes and biscuits, for your Jubilee cake stand. 


Happy Making!

Friday 16 March 2012

strange days...


My baby was due 4 days ago! I closed my online stores a couple of weeks ago, but my patterns are still available at Ravelry, and there are some free patterns there too.


I've been nesting, organizing, sewing, but not really crocheting. H is standing up (and toppling over!) so all my time is spent watching him and catching him at the last moment, he is suddenly very hard work. But lots of fun, and really starting to communicate a lot. He'll be 1 in a couple of week's time. The spd pain is worse than ever, some days I can't stand up long enough to make a cup of tea (which is a disaster for me, as I drink gallons each day!). I'm so looking forward to having this baby, getting back to normal and going on long walks along the canal with the double pushchair.


I made a 'cheat' patchwork quilt for the baby, out of the tablecloth fabric we used at our wedding, and some other scraps. In the evenings I've been doing cross stitch, sometimes I like to do a project that doesnt involve any thinking, its quite therapeutic. I have to do something to stop me going insane from being trapped in the house. I pretty much only leave the house for midwife appointments, even walking to the car is torture.


And a kitsch 70's tapestry for H.


Maybe next time I type here, I'll have a baby!

Monday 13 February 2012

Waiting...


It's kind of a strange time here, I have 3 weeks until my due date so I'm tying up loose ends with work, making sure my website is up to date, sorting out baby clothes, packing my hospital bag, and just generally nesting, but not making any plans and trying not to start any new projects. We're in the middle of having our loft converted, and in the meantime all our junk is piled in heaps in H's bedroom, (which is soon to become 'the boy's room!'). So until it's finished, I wont feel I'm ready for our new little boy. I still think I'm denial about having another baby!


I guess its time to enjoy H being on his own for the last time, but I'm still pretty much housebound, I can just about walk to T's car but managing stairs, or picking up H are getting harder all the time. I can handle constant pain (just about!) but I can't handle having to ask my husband to do pretty much everything for me.

Here's H, falling asleep halfway through lunch! Probably my own fault for keeping him in his PJs all morning.


I finished my hexagon blanket, the colours I chose were just scraps of yarn I had, but I really like how it turned out. 


I'll be turning off my online shops in 2 weeks, so now's the last chance to buy my crochet patterns until autumn.